Upgrading Citrix Director to 7.15 LTSR breaks export to Excel

After upgrading from Citrix Director 7.6 to 7.15 LTSR release I found out that exporting to Microsoft Excel was broken. See the following Error Message:


ErrorMessageDirector

And this message in the Event Viewer:


This problem can be fixed by either running the MSI again and choosing repair. After that, it works.

What the repair does, is place an extra file in the folder: C:\inetpub\wwwroot\Director\Bin called DocumentFormat.OpenXml.dll


DocumentFormat.OpenXml.dll

So, you could also find a copy of this file on a working server and copying it manually to the failing server.

Make USB SuperDrive work on any Mac


Apple USB SuperDrive MD564ZMA 01 angle thumb


I recently bought an USB SuperDrive for my 2012 MacBookPro. When I tried to use it, it didn’t accept any DVD’s in the drive, but was working on another machine I have (MacBook Air). That led me to search the net for other people with maybe the same problem.

Found the following description:

1. open a terminal

2. type (on a single line)

sudo pico /Library/Preferences/SystemConfiguration/com.apple.Boot.plist

3. Insert mbasd=1 in the <string></string> value below the <key>Kernel Flags</key>

The file will then look like:

<?xml version=”1.0″ encoding=”UTF-8″?>
<!DOCTYPE plist PUBLIC “-//Apple//DTD PLIST 1.0//EN” “http://www.apple.com/DTDs/PropertyList-1.0.dtd”>
<plist version=”1.0″>
<dict>
<key>Kernel Flags</key>
<string>mbasd=1</string>
</dict>
</plist>

4. Save (press Ctrl-X, answer yes to save by pressing Y, press enter to confirm the file name). 5. Restart your machine. That’s it!


It worked like a charm!!

Citrix Provisioning Services MAPI Error

I recently came across the following error message while updating the properties of a vDisk on Citrix Provisioning Services 6.1. I tried to update the version from Maintenance to Production.

“An unexpected MAPI error occurred.” “Failed to map vDisk. No Driver.”


I found a way to update the properties of the vDisk with the following procedure:

Open the Citrix Provisioning Services console and open the vDisk store

vDisks


Right click on the vDisk and select Properties


Go to the Microsoft Volume Licensing tab and set the license management to None. Click OK.

Now, right-click on the vDisk again and select Versions.


Click Promote.


Select Production –> Imidiately or do as you see fit.

Now you can put back the properties of the vDisk to have KMS license management again:

XenApp 6.5 Unattended deployment through SCCM 2007

I have been busy troubleshooting an unattended XenApp 6.5 for Windows 2008 R2 SP1 deployment lately. This deployment was done through SCCM 2007.

The whole installation went correct up until the point of running XenAppConfigConsole.exe with it’s appropriate parameters. After trying a whole bunch of different deployment techniques, I found one that works!

The Task Sequence (at least the part of the XenApp 6.5 setup), looks as follows:

  • Move Computer Object in AD to an OU without policy objects
  • Restart Computer
  • Install Citrix XenApp 6.5
  • Restart Computer
  • Disable COM+ Application Access Check
  • Install Citrix Hotfixes XA 6.5 EN
  • Restart Computer
  • Copy XenApp Configuration DSN file to %TEMP%
  • Copy MDT Tools to %TEMP%
  • Run Citrix XenApp Config Tool
  • Restart Computer
  • Install Citrix EdgeSight 5.4 XenApp Agent
  • Restart Computer


The syntax for the task: Run Citrix XenApp Config Tool is as follows:

“%WINDIR%\Temp\MDT\ServiceUI.exe” -process:tsprogressui.exe “C:\Progra~2\Citrix\XenApp\ServerConfig\XenAppConfigConsole.exe” /ExecutionMode:%Citrix_Create_Join% /FarmName:%Citrix_Farmname% /CitrixAdministratorAccount:%Citrix_Username% /DsnFile:%WINDIR%\Temp\%Citrix_DSNFile% /AuthenticationType:Windows /ODBCUserName:%Citrix_Username% /ODBCPassword:%Citrix_Password% /LicenseServerName:%Citrix_LicenseServer% /LicenseModel:XA /AddLocalAdmin:True /ForceShadowPopup:True /ForceShadowLogging:True /CreateAnonymousUserAccounts:False

The variables are set through Collection Variables in SCCM and contain the appropriate information for creating / joining a Citrix XenApp 6.5 Farm.


Hope it helps!

Citrix End User Experiencing Monitoring service crashing.

I recently ran into the problem that in Citrix EdgeSight 5.4 the Citrix End User Experiencing Monitoring service kept crashing.

It created the following error message in the Logfile:

Failed to co-create SEMS plugin. hr=0x8007041D


This error message is related to the fact that this service seems to check it’s certificate online. In this environment, there was no internet activity available, hence the error message.


You can prevent this error message from appearing by creating the following file in Notepad:

C:\Program Files (x86)\Citrix\Euem\Service\SemsService.exe.config

Give it the following contents:

<?xml version=”1.0″ encoding=”utf-8″?>
<configuration>
<runtime>
<generatePublisherEvidence enabled=”false” />
</runtime>
</configuration>


Or you can download the file here: SemsService.exe.config


After restarting the “Citrix End User Experiencing Monitoring” service, the problem is resolved.

Citrix Web Interface return to login screen

I sometimes run into the following problem at a customer:

Whenever a user clicks the logoff button, you land on the following page:

Logoff Landing Page


This may not be wanted, especially when the Web Interface is used as a primary logon point for users.


You can return to the logon page automatically by performing the following actions:

– Open the Citrix Web Interface Management Console

– Select the XenApp Website that you want to change

– Right click with your mouse on the website, select Site Maintenance and select Diagnostics Logging

– In the section Logged Off Pages, set the radiobutton to “Use a custom logged off page URL”

– In the text field, type the URL of your XenApp Website.

– Click OK and you’re done.

In my case:

Logged Off URL


Change root password XenServer pool

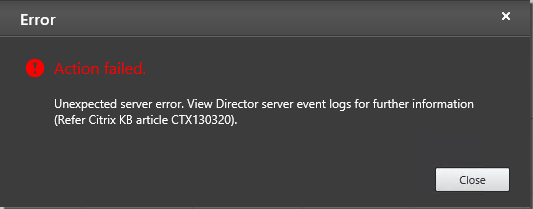
I have just finished creating a PowerShell script that changes the local root password for a Citrix XenServer pool.

You will find a ZIP file containing the script here: http://muya.no-ip.info/wordpress/wp-content/uploads/2011/09/Change-root-Password-XenServer.zip


Script:

function Get-EncryptedText($text) {

$Ptr = [System.Runtime.InteropServices.Marshal]::SecureStringToCoTaskMemUnicode($text)

$result = [System.Runtime.InteropServices.Marshal]::PtrToStringUni($Ptr)

[System.Runtime.InteropServices.Marshal]::ZeroFreeCoTaskMemUnicode($Ptr)

$result

}

Try {

Get-PSSnapin XenServerPSSnapin -ErrorAction Stop

}

Catch [Exception] {

If ($env:PROCESSOR_ARCHITECTURE -eq “AMD64”) {Invoke-Expression “$env:systemroot\Microsoft.NET\Framework64\v2.0.50727\InstallUtil.exe ‘c:\Program Files (x86)\Citrix\XenServerPSSnapIn\XenServerPSSnapIn.dll'”; Add-PSSnapin XenServerPSSnapin}

If ($env:PROCESSOR_ARCHITECUTRE -eq “x86”){Invoke-Expression “$env:systemroot\Microsoft.NET\Framework\v2.0.50727\InstallUtil.exe ‘c:\Program Files\Citrix\XenServerPSSnapIn\XenServerPSSnapIn.dll'”; Add-PSSnapin XenServerPSSnapin}

}


$PoolMaster = Read-Host ‘Enter Poolmaster’

$Username = Read-Host ‘Enter Username’

$Password = Read-Host -AsSecureString ‘Enter Old Password’

$NewPassword = Read-Host -AsSecureString ‘Enter New Password’

$NewPasswordPlain = Get-EncryptedText $NewPassword$

PasswordPlain = Get-EncryptedText $Password


# // Build connection to xenserver


Try {

$Connect = [XenAPI.Session] ($(“https://” + $PoolMaster))

$Connect = Connect-XenServer -Server $PoolMaster -UserName $Username -Password $PasswordPlain -NoWarnCertificates

}


Catch [XenAPI.Failure] {

$Connect = Connect-XenServer -Server ($($_.exception.ErrorDescription[1])) -UserName $Username -Password $Password -NoWarnCertificates

}


# // Change Password

$Connect.change_password($PasswordPlain, $NewPasswordPlain)

XenServer 6.0 Beta available

Last week Citrix released XenServer 6.0 Beta.

Below is an overview of what’s included in the XenServer 6.0 Beta.

Product simplification.

  • XenServer has simplified the management infrastructure requirements for features such as Workload Balancing, StorageLink, and Site Recovery.  In fact, for StorageLink and Site Recovery, no additional management infrastructure is required at all.
  • Workload Balancing (and its Historical Reporting features) is available as a Linux-based virtual appliance for easy installation and management.
  • The Linux supplemental pack has been removed, so there is only 1 base installation CD. ”Linux demo VM” functionality has been moved to a virtual appliance format so it can be easily imported into a host or resource pool.

Architectural Changes

  • The XenServer 6.0 release is based on the Xen 4.1 hypervisor
  • The Open vSwitch (OVS) is now the default network stack for the product.   OVS was first introduced in XS 5.6 FP1 as a post-install configuration option, and is the basis for the distributed virtual networking (DVS) features, NIC bonding improvements, and  jumbo frames support .  Improvements to DVS include improved availability through the “fail-safe” option, as well various improvements based on customer feedback from XenServer 5.6 FP1. Note that the legacy Linux bridging stack is still available via a post-install configuration option
  • General network performance has been improved, particularly aggregate host network throughput; internal measures vs. prior XS releases show gains of 70-100% in some instances
  • Support for hardware-assisted (SR-IOV) network performance optimizations has been improved, particularly for use with the NetScaler VPX and SDX products

Tools for Self-Service and building Clouds

  • The new Self Service Manager feature enables you to build self-service environments for “private clouds.”  Self-Service Manager includes support for both XenServer as well as VMware vSphere
  • Self-Service Manager is easy to deploy and manage via a simple virtual appliance and web-based UI.  It offers multi-tenant support for creating VM “service catalogs” used by delegated administrators to deploy and manage their own applications and resources
  • Virtual Appliance support.  Within XenCenter 6.0 you can create multi-VM virtual appliances (vApps), with relationships between the VMs for use with the boot sequence during Site Recovery.  vApps can be easily imported and exported using the Open Virtualization Format (OVF) standard
  • VMDK and VHD import functionality is integrated into XenCenter for interoperability with VMware VMDK and Microsoft VHD disk images. Reliability of the “transfer VM” used for appliance import/export has been improved

Microsoft System Center integration

  • Starting with the XS 6.0 release, you will have the option of managing XenServer hosts and VMs with System Center Virtual Machine Manager (VMM) 2012.  For more information refer to the Microsoft System Center 2012 beta page
  • System Center Operations Manager 2012 will be able to manage and monitor XenServer hosts and virtual machines
  • System Center integration is available with a special supplemental pack from Citrix, which is targeted for general availability when System Center 2012 ships later this year.

XenDesktop

  • 6.0 is the first XenServer release to include HDX enhancements for optimized user experience with virtual desktops
  • With the 6.0 release, a physical GPU can be assigned to a VM so the applications running in the guest can leverage GPU instructions (“GPU pass-thru”).  This provides significant TCO benefits for the XenDesktop HDX 3D Pro technology used for delivery of CAD and other graphical applications via virtual desktops

Guest OS support updates

  • Formal guest support for Ubuntu 10.04
  • Updates for support of RHEL 5.6, CentOS 5.6, and SLES 10 SP4
  • Experimental VM templates for Ubuntu 10.10 and Solaris
  • Note also that RHEL 6.0 is fully supported (also supported with XS 5.6 SP2)

Other enhancements and improvements

  • A “rolling pool upgrade” wizard is provided in XenCenter to enable more reliable upgrades from 5.6 and 5.6 FP1 to 6.0.
  • High Availability (HA) permits configuration of a boot sequence for recovery, as well as storage of the heartbeat disk via NFS
  • Host RAM support has been increased to 1 TB
  • VM vCPU and vRAM support is increased e.g. up to 16 vCPUs and 128 GB RAM for Windows; increased Linux vCPU and vRAM support levels vary by distro
  • NIC bonding reliability is improved, and formal support for active/passive bonding has been added
  • XenCenter will be localized into Japanese and Simplified Chinese (these will be generally available a few months following the English release)

Noteworthy changes to existing features

  • Lab Manager has been superseded by Self Service Manager.  Lab Manager will continue to be supported with XenServer 5.x through December 2012 according to the lifecycle policy posted here
  • StorageLink: With the move from the Windows-based “StorageLink Gateway” to “integrated StorageLink,” some StorageLink array support is being retired.  Focus for StorageLink support is being placed on arrays with standards-based SMI-S interfaces (e.g. EMC CLARiiON) and those which are widely used with XenServer (NetApp and Dell EqualLogic).  Arrays whose StorageLink supportability is being retired will continue to be supported via the standard iSCSI and Hardware HBA Storage Repositories.  StorageLink Gateway will continue to be supported with XenServer 5.x until September 2013 according to the lifecycle policy posted here.   Note also that the new “rolling pool” upgrade takes care of upgrading from StorageLink Gateway, and performing validation for unsupported arrays
  • Site Recovery:  Site Recovery is no longer based on StorageLink.  This enables DR support for virtually any iSCSI or Hardware HBA storage repository scenario where the underlying array includes replication features (either supplied by the array vendor or a third-party replication scenario)

XenServer Self-Signed Certificate

I recently ran into an issue where I had to take a XenServer from a development environment and run it into a production environment. Since time was of the essence, I had not created a freshly installed XenServer host, but just changed the IP addresses.

So, when I tried connecting to the server over https, it said that the certificate wasn’t correct anymore. It seems the self-signed certificate is created based on the IP address of the XenServer host.
Below you find the procedure to recreate a new certificate based on the new ip address.
Login as a root user:
1. cd /tmp
2. openssl req -x509 -nodes -days 3650 -subj ‘/C=NL/ST=N-Holland/L=Amsterdam/CN=(NEW_IP_ADDRESS)’ -newkey rsa:1024 -keyout certificate.pem -out certificate.pem
3. cd /etc/xensource/
4. mv xapi-ssl.pem xapi-ssl.pem_orig
5. cp /tmp/certificate.pem ./xapi-ssl.pem
6. chmod 0400 /etc/xensource/xapi-ssl.pem
7. /etc/init.d/xapissl restart
That should do the trick… It created a self-signed certificate that lasts for 10 years.

XenDesktop 5 Maintenance Script

I’ve just finished creating a XenDesktop 5 Maintenance Script in PowerShell. Currently running tests to run the script on the Controllers through SCCM.

What the script does (in a nutshell):

  1. Connect to XenServer
  2. Start the VM
  3. Update the virus definition files
  4. Update the App-V cache
  5. Shutdown the VM
  6. Make a new snapshot
  7. Update the VDI’s to use the new snapshot.

Let’s wait and see….